
The Main Window
Once you have completed Getting Started your main window will consist of 2 sections. The top half will include the application Menu and a grid listing of all of your processing profiles, while the bottom half is devoted to the MS Windows Services and actually running your profiles and the business of importing HL7 messages.

In the File menu:
• New Profile. Select to create a new processor profile.
• Exit. Closes the program.
In the Tools menu:
• Global Settings. Opens the Global Settings Window
• Open the Installation Folder. Opens the folder where the software is installed in Windows Explorer.
In the Help menu:
• About. Opens a System Report with a wealth of information about your profiles and windows services.
• Open Online Help. Opens this help document. You can also press the F1 Key on the keyboard.
Your Profiles List
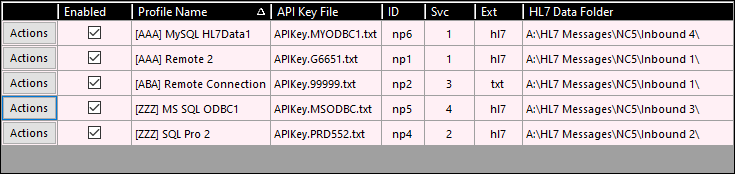
The profiles list displays all of your profiles. You can click on a column header to sort by that field.

Click the Actions button in the profiles grid to open the Profile Actions Window.
 Profile Actions Window
Click Edit the Selected Profile to edit your profile. OR Click Delete the Selected Profile to delete your profile. IMPORTANT: This is permanent and cannot be undone.
|
Your Windows Services
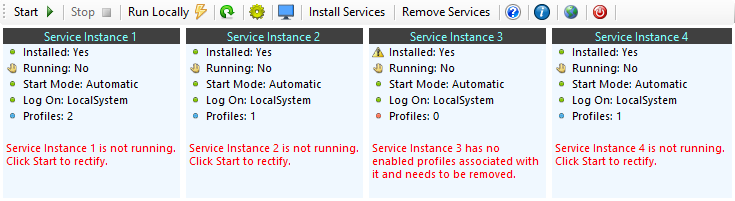
The Windows Services area of the main window gives you instant visual feedback on the current status of all 4 of the MS Windows Services included with this product. Under each Service Instance you can see a short list of status values for that service. They are:
1.Installed - Will indicate whether the Service Instance is registered in your MS Windows Services list.
2.Running - Will indicate whether the Service Instance is running or not.
3.Start Mode - Will show you the Start Mode of the Service Instance (the default mode is Automatic, but you can change it in the Windows MS Services list).
4.Log On - Will show the MS Windows user account which runs the Service Instance (the default is LocalSystem but you can changes this in the Windows MS Services list).
5.Profiles - Shows the number of processor profiles assigned to the Service Instance. See Creating Profiles for information on setting or changing this value.
6.Status Message - Will show a short text status message. If the text is RED this generally indicates some type of problem which may need your attention.

As you use the software you will notice that the enabled state of the buttons on the toolbar will change dynamically whenever the services status is refreshed. Buttons on the toolbar will only be enabled if the action they perform is a) Needed and b) Able to be done. For instance in the Toolbar image above the Stop  button is disabled. This is because either a) None of the services are installed or b) None of the services are running. The Remove Services button IS enabled. This means that a) There ARE services installed and b) None of them are currently running so they CAN be removed if you like.
Toolbar Buttons and What They Do
Start  - Issues a Service Start command for all installed services.
Stop - Issues a Service Stop command for all running services.
Run Locally  - Opens up the Run Locally Window allowing you to run your profiles in a window and see them operate.
 - Does an immediate REFRESH of the Windows Service statuses for all Service Instances.
 - Opens up the Microsoft Windows Services snap-in.
 - Opens up the Computer Management snap-in.
Install Services - As you might expect clicking this button will install / register the SQL Extender windows services in the MS Windows Services list. It will ALSO remove any services which NEED to be removed (if they have no profiles attached to them). As a good rule of thumb, IF this button is enabled then you need to click it.
Remove Services - Clicking this button will remove ALL of the SQL Extender windows services from the MS Windows Services list.
- Opens this online help
- Opens a Windows Services report.
 - Opens your Global Settings.
 - Exits the Program.
About Installing and Removing Windows Services
This SQL Engine Extender software uses a different mechanism for installing and removing MS Windows services than the one used in the UltraPort SQL Schema Engine, or our other UltraPort HL7 Products which use the .Net Framework. Those programs use a Microsoft utility program named InstallUtil.exe. This utility doesn't work with these new services developed using .Net 5 so we use a newer Microsoft utility named SC.exe.
The problem with SC.exe is that it REQUIRES local Administrator user privileges to run, so if you do not have local Administrator privileges on the computer/server running the SQL Engine Extender it will give you an error message when you click Install Services or Remove Services. If this occurs there are several things that you can try.
1.Try running the Extender Configuration program as an Administrator. Just open the installation folder (using the Tools Menu above), close the configuration program, then in Windows Explorer RIGHT click on the configuration program (UPSqlSchemaNC5Config.exe) and click "Run as Administrator". When the program starts this time try your action again. If you don't have this option try #2.
2.Open a Services Report (click on the toolbar). In this report (and also in the Help -> About report from the main menu) you can find both the INSTALL command lines and the UNINSTALL command lines for each Extender Windows service (see screenshot below). You can then open an Administrator Command Prompt. In your windows search bar search for "Command" and then RIGHT CLICK on "Command Prompt" and choose "Run as Administrator". You can then just COPY the appropriate command line from the Report and PASTE it into your Command Prompt and press enter. Important Note: There are TWO commands to install a service and only ONE command to remove a service. If this does not work you will have to use option #3.
3.Call for help (no, do not call us, there's nothing we can do). You will have to have someone with System Administrator rights actually log into the computer and do this for you. They should be able to just start the configuration program (UPSqlSchemaNC5Config.exe) and click which ever button you need (Install Services or Remove Services) and voila you're done.

Command Lines to Add / Remove Services